Last Updated on February 14, 2025 by Rachel
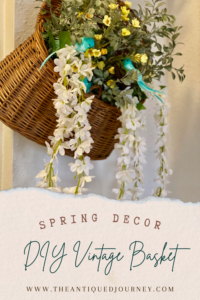
A floral vintage door basket for Spring adds whimsy and welcomes guests with cheer!
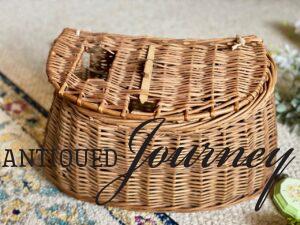
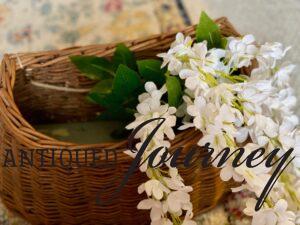
The inspiration for my basket door display came from a vintage creel used for fly fishing. My husband received it as a gift a few years ago and it’s just been sitting on a shelf, collecting dust. It was about time to use it for something pretty! Follow along as I show you how to create a floral vintage door basket for Spring.

DIY Spring Basket Wall Decor
It’s an extra fun post this week because I’m collaborating alongside my friend Anna from Sky Lark House! Together we are bringing you two different ways of using a vintage basket to create a door hanging for spring.
Her front door basket is featured below. Look how beautiful!
Decorating Walls, Shelves, and Mantels with Baskets
Baskets are, in my opinion, just the perfect home decor item. They have so much texture, come in pretty colors, and are extremely versatile.
Vintage baskets can be found, for mere dollars, at:
- thrift stores
- garage sales
- flea markets
- antique shops
You can find uses for baskets in every single room of your home, whether for storage, decor, or otherwise.
Today I am going to show you how to use a vintage basket to create a floral decor piece, so let’s get started!
Shop Vintage Baskets

Using a Basket for Seasonal Decor
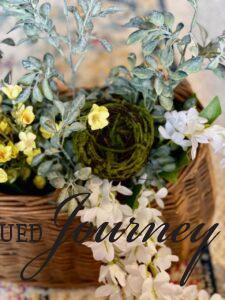
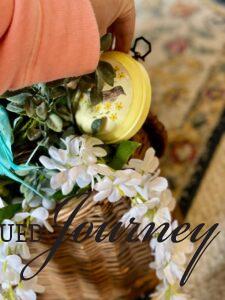
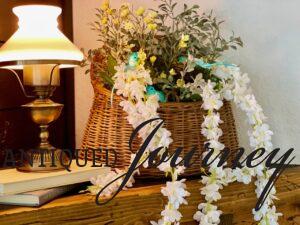
Here’s my creel…the star of the show! Any basket will do but try and keep it to a small to medium size so that it doesn’t get too heavy.
Materials Needed for a Vintage Floral Front Door Basket
- small to medium sized basket
- rope or twine (for hanging, if needed)
- 1-2 blocks of floral foam
- floral cutters
- floral wire
- faux stems
- faux accessories like a bird nest or birds
- hot glue gun
Blooming Spring Welcome: Creating a Floral Vintage Door Basket
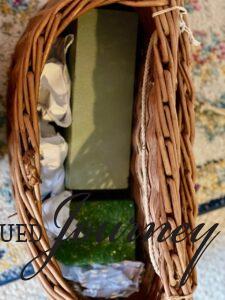
1. Insert Floral Foam Into the Basket.
I used two different sized blocks of floral foam.
You decide how many blocks you need depending on the size of your basket.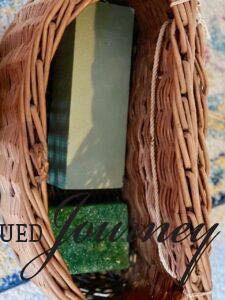
Then, I crinkled up printer paper and stuck that down into the front so that the floral foam would stay in place.
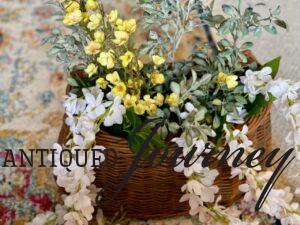
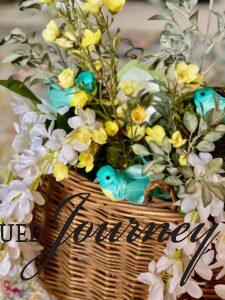
2. Arrange Floral Stems.
Play around here for awhile.
Insert some stems and just keep moving them around until you are happy with the placement with your DIY Spring basket.
You may need to cut the stems down so that the stems sit lower in the basket.
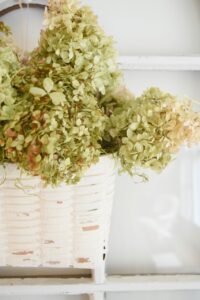
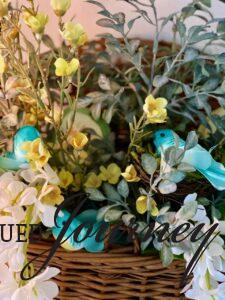
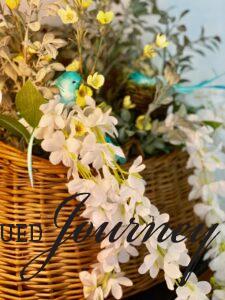
Keep playing and arranging the stems. I liked the look of the white Wisteria flowers draping over the sides and having the rest of the basket filled with yellow flowers and greenery.
Floral arranging is super peaceful to me. Let joy lead this process!
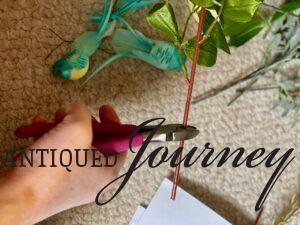
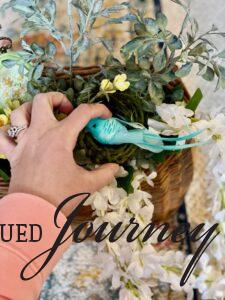
3. Place Accessories in the DIY Spring Basket.
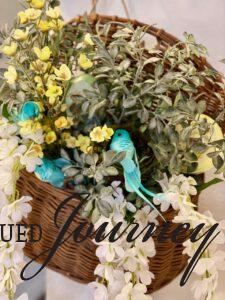
I used three cute birds in a beautiful teal color, a bird’s nest, and some small vintage bird plaques.
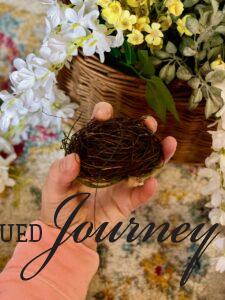
To attach the bird nest, I inserted floral wire through back and twisted it.
Then, I just pushed the wire down into the stems. The nest is now anchored in place!
Using a hot glue, attach one of the birds to the nest.
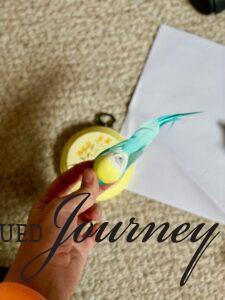
Squeeze a roughly dime size amount of glue onto the back of the bird, then hold it in place for around ten seconds.
I followed those same steps to attach the other birds.
My tip for placing your accessories is to look for any spots that seem a little bare. I usually place my pieces first to see if I like it and then glue everything down.
But, the beauty of hot glue is that it peels off easily without causing damage to the surface, so you can always pull a piece off and move it if you end up wanting it somewhere else.
 This cute little bird plaque came from the thrift store. It was only .79 cents and thought it would look so cute nestled in among the branches.
I just put a small bead of hot glue along the back to secure it to the basket.
You can see the green bird plaque in the photo below. They look so pretty among the flowers and birds, adding that touch of vintage that I just love.
4. Add Twine or Rope for Hanging, if Needed.
My basket has a built in rope attached to the back, but you can simply loop twine or rope through the back and tie it off.
Display Ideas for DIY Spring Basket Decor
Here’s my basket hanging in the entryway.
I think it’s so pretty how those white flowers spill out over and top and hang down.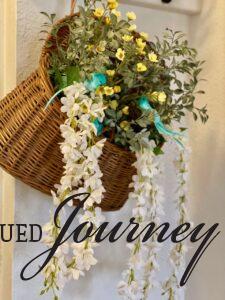
Alternatively, you could try these places for your floral vintage door basket:
- hang the basket on a screen or front door
- from hooks
- over a vintage window
- display it on a shelf or a mantel
 Here is my vintage floral door basket on the fireplace mantel. It looks just as stunning sitting as it does hanging.
Wherever you choose to put it, this vintage basket piece will bring in so much texture and color to your home.
Closing Tidbits on Blooming Spring Welcome: Creating a Floral Vintage Door Basket
I’m so happy with how my floral vintage door basket turned out! It was so fun to use something that I already had in my home and turn it into a beautiful piece of decor.
I encourage you to take this tutorial and run with it to create a special, unique basket decor piece for your home. Let joy and creativity lead you!

Let me know in the comments if you have a basket to re-purpose! What would you add to your basket door decor? I would love to know!
Again, head over and say hello to Anna at Sky Lark House and read all about her basket decor! I think she’s amazing, super funny, and her blog is incredible. I’m grateful to be her friend in this large blogging world. It was so fun to collaborate with her on this Spring project!

Click on the red button to save it for later!
If you are new here, I’m Rachel, the writer and content creator here at The Antiqued Journey. I’m so happy to have you! I encourage you to stop by the ‘about me’ page to get to know me a little more.
Here on the blog, you will find loads of inspiration for decorating with vintage and antique decor, simple DIY crafts and many thrifting adventures. If that interests you, I invite you to sign up for my e-mail. You will receive a free digital download as a thank you!


33 Comments. Leave new
Rachel! This was so much fun working with you on this idea. I love your floral vintage door basket and the birds you added are DARLING!! Happy Spring my friend.
SO FUN!!!! Thank you, Anna!!!
I love using vintage fishing creels. Your spring floral basket is a great idea. Love the little birdies in the mix!
Hi Deb!!
Thanks for stopping by! Aren’t creels so neat?! Thanks so much for your encouragement!! I appreciate it!
Your basket came out amazing! Love it. So perfect for Spring!
Thank you Meagan!!!
This is such a great idea for spring, Rachel! I love the way everything came together and using the fishing creel basket as a floral container is totally fabulous. Hugs and Happy Easter weekend, CoCo
Hi!!
Thank you!! I appreciate your lovely thoughts, CoCo! Happy Easter to you!
I’ve always loved creel baskets — what a great idea! Very spring-y:) Thanks for sharing at Vintage Charm! xo Kathleen
They are so pretty, aren’t they?? Thank you for your lovely comment, Kathleen!! I do appreciate it!
Just popping in to say thanks so much for linking up at Farmhouse Friday last week! I loved this vintage door decor idea so much that I’m featuring it on Friday. Hope you link up again and I appreciate the support. Always love your posts. pinned
Hey Cindy!!
Thank you!!! I appreciate your support more than you know and am so thankful. I always LOVE the Friday party. Thanks again Cindy and hope you have a lovely day!!
[…] with some Spring finery, you’ll love this one. Rachel from The Antiqued Journey shared her Floral Vintage Door Basket, with a great tutorial to help us recreate something similar. So much […]
[…] with some Spring finery, you’ll love this one. Rachel from The Antiqued Journey shared her Floral Vintage Door Basket, with a great tutorial to help us recreate something similar. So much […]
[…] at The Antiqued Journey shares the steps to making this vintage basket into a springy door decor idea. Looks like it […]
[…] My good friend Rachel at The Antiqued Journey put together such a sweet thrifted floral basket and added in the cutest little blue birds and nest. For more pictures and steps on how to create this look visit her post, Floral Vintage Door Basket. […]
[…] use baskets for all sorts of things. When it comes to decorating, baskets make amazing bases for seasonal vignettes. For simple shelf decor, stick some faux greenery or […]
[…] Baskets are such versatile pieces of decor. They can be painted, arranged, hung, or set on a shelf. […]
[…] Floral Vintage Door Basket […]
[…] Floral Vintage Door Basket […]
It turned out so cute, Rachel. I LOVE the basket. And the addition of the nest and the little birds is the perfect finishing touch for spring.
Hi Jen!
Thanks so much!!
[…] doesn’t necessarily need to be a tray. It could be a basket, a platter, or even a […]
[…] can purchase many craft supplies at the dollar store, at thrift stores, and from garage sales. The floral basket above would probably cost around $45 at a retail store but this one I made at home for around $20. […]
[…] re-finishing antique furniture as well as simple home decor DIY projects. Anna and I worked on a door basket project together a few weeks ago and it was SO fun. Photo courtesy of skylarkhouse.com I admire […]
That basket is amazing Rachel! It looks so pretty dressed up for Spring! I love the addition of the sweet little bird’s nest!
Thanks so much!!
[…] basket you have around your house will do for a basket vignette. If you don’t have a basket, check your local thrift store. In my experience, those stores […]
Morning! I need to go to the attic for a metal Victorian style hanging basket to fill with spring florals!
Hi, Linda!!
That sounds lovely!! What a great idea!
[…] Then, as I was rummaging around in my craft drawer, I happened upon this faux bird’s nest that I totally had forgotten about! I used it last Spring in my vintage floral door basket. […]
[…] you remember my door basket from the spring, which was also a collaboration with Anna, I had the faux white Wisteria trailing […]
[…] Floral Vintage Door Basket […]