Last Updated on January 14, 2025 by Rachel
Create a DIY Valentine’s wreath using paper doilies that is easy and budget-friendly!
I was determined to make pretty Valentine’s Day decor out of these paper doilies. They have been in my craft stash for a few years now! I’m not one for tacky or bright Valentine’s decorations, so these white, lace-looking doilies fit the bill perfectly. Creating a DIY Valentine’s wreath using paper doilies is simple and inexpensive, coming in at under $15.
This project just kind of came to me so I went with it, figuring it out and experimenting along the way. I hope you enjoy this one!
Materials Needed for DIY Valentine’s Wreath using Paper Doilies
- one metal wreath form
- one package of paper doilies
- a glue stick
- 2.5 inch wire-edged ribbon
- white faux floral stems
- hot glue gun
- scissors
- floral cutters
- twine
DIY Valentine’s Wreath Using Paper Doilies Tutorial
1. Start by cutting the whole doilies into 4 pieces, like pizza slices!

Cut a decent amount of pieces to start with. You can cut more pieces as needed.

2. Next, starting on the outer-most ring of the form, fold the triangle end of a doily piece around to the back side of the wire and secure with a glue stick.

3. Continue this process all the way around each of the wires.
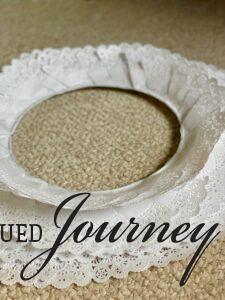
Make sure the doilies are touching on each side to make sure none of the wires are seen. You can even overlap the pieces slightly if you like for a fuller looking wreath.
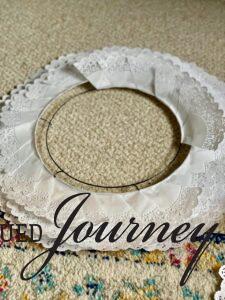
You should notice each layer lifting up just a tad, which is what you want.
That’s what creates the ruffle-like effect.
4. Next, cut your floral stems.
These stems are exactly what I was looking for because I didn’t want anything too big or heavy.

I found these faux baby’s breath stems at Hobby Lobby.
They seemed like a beautiful choice for this DIY Valentine’s wreath using paper doilies.

5. Then, arrange your stems and glue them down.
Tip: I suggest arranging them near the bottom of the wreath. If they are too close to the top, they become too heavy and the paper flops over.
I decided to have my stems slightly off center but you arrange them in a way that is pleasing to you.

Squeeze a line of hot glue onto the doilies.
Place your stems on the hot glue and hold for a few seconds.
Continue this process until you have the amount of stems that you would like.
Tip: I suggest not using too many stems because you don’t want the paper doilies to rip or start flopping over. Keep it light and airy!

6. While the stems are drying, grab the ribbon that you chose and start creating your bow.
This pretty floral ribbon was found at Hobby Lobby. I didn’t want my ribbon to have all kinds of hearts and glitter all over it yet still wanted it to have an overall Valentine’s feel. This one hits the mark perfectly AND you can re-use it for spring!
Tip: Try and choose a ribbon that is at least 2 inches wide because it will make your wreath look more complete!

Cut a piece of ribbon that is approximately 14 inches long. I did nothing extravagant to make my bow.
I literally just tied a knot in the middle, like tying a shoe, and then made my loops.

It looked like this. Simple is better here because of the elegant look of the doilies. I fluffed the loops and trimmed the tails so that they were about the same length.
Then, I decided to cut little triangle details at the bottom of each ribbon tail.

When you have your bow the way you like, go ahead and hot glue it right in the middle of the floral stems. This will cover up the stems of the flowers and make it look much cleaner!

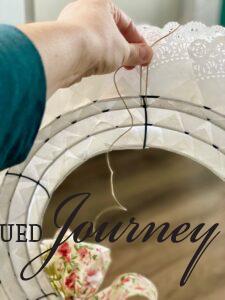
7. While that is drying, cut about a 6 inch piece of twine for the hanger.

Turn the wreath around, making sure it is hanging the way that you want it to.
Thread the twine through one of the wires, pull through, and knot at the top.
Cut off the excess so that you don’t see the twine when it is displayed.
Simple and Frugal DIY Valentine’s Wreath
You have yourself a finished wreath!

Creating a DIY Valentine’s wreath using paper doilies is so fun! This wreath adds such a simple elegance to your home for Valentine’s Day decor.
The doilies remind me of a vintage lace linen, which is the perfect texture for this holiday.

Valentine’s Day is a day all about love! Love for a significant other, love for your pet, love for your family, love for self, or love for nature.
You can also infuse love into your home by incorporating decor that is unique to you and that makes each space feel warm and inviting.

Closing Tidbits for DIY Valentine’s Wreath Using Paper Doilies
I truly hope this tutorial on creating a DIY Valentine’s wreath using paper doilies is helpful for you! Sometimes it’s difficult to find inexpensive Valentine’s day decor, especially if you are on a budget.
Let this DIY inspire you to use the ideas shown here and make it your own. Be encouraged to embrace this season of love and be inspired to create along the way!

Let me know in the comments how you decorate for Valentine’s Day! Is there anything special that you do or traditions that you have? I would love to hear!

Just click the red button in the left corner!

If you are new here, I’m Rachel, the writer and content creator here at The Antiqued Journey. I’m so happy to have you! I encourage you to stop by the ‘about me’ page to get to know me a little more.
Here on the blog, you will find loads of inspiration for decorating with vintage and antique decor, simple DIY crafts and many thrifting adventures. If that interests you, I invite you to sign up for my e-mail. You will receive a free digital download as a thank you!


35 Comments. Leave new
I love how the ribbon accents your plates! Lovely..
Thanks mom!
Rachel,
Thanks so much for this shout out. I loved your wreath. So cute.
Hi Rachel! Thanks so much and you are so welcome!
Very nice!
Thanks!
Hi Mariya! Thanks so much for stopping by today and for your lovely comment!
Your wreath is so delicate and sweet…. Just like you!
Thank you!!
This is so cute and creative, Rachel! I love it so much. It’s the perfect soft and romantic way to celebrate the holiday. Hope your Valentine’s Week is filled with all good things, CoCo
Hi CoCo!
Thank you so much for stopping by my little corner of the blogging world. I appreciate your lovely comment very much! All good things to you as well!
I love this beautiful wreath. Fabulous job.
Thank you!! So easy!!!
So pretty Rachel! I love how it looks like vintage lace. So easy to make too!
Thank you!!
[…] Valentine Wreath With Paper Doilies […]
Oh I absolutely love this Rachel. SO sweet & so easy. You’re a genius. I prefer muted colors for Valentine’s too so this is perfect. XO- MaryJo
Thank you!!
Rachel! I love this idea!! It’s absolutely fabulous. Thank you for the tutorial. I also love that you used white paper doilies.
Thank you!! This literally just came to me as I was staring into my craft drawer 🙂 It’s fun!!
What a pretty wreath! I wonder if you could use fabric doilies?
I’m sure you could! That would be beautiful also. I just used what I had on hand. Thanks for coming by!
This is so pretty! I’ve always loved paper doilies, but haven’t used them for years. Now you’ve got me thinking…they’re so romantic cottage! Pinned!
thank you!! They are…I love how lace-y they look!
Hi Rachel! This is the sweetest wreath ever! I like to use cream, white, and soft pinks for Valentine’s day, so I love the idea of using white doilies! Your ribbon pairs beautifully with your china! I can’t believe Valentine’s day is right around the corner! Happy day to you!
Thanks!! I love how lace-y doilies are…even paper ones. It’s like vintage granny chic in the best way! Haahahaa! thanks for reading so many posts, Donna!! I appreciate it!!
Oh my golly! This is so cute and creative. I love it! As a matter of fact, I love it so much, I’m featuring it tomorrow on Farmhouse Friday. Thank you for always linking up. I so appreciate it. pinned
Thanks so much, Cindy!! I appreciate it more than you know!!
Hi, Rachel! Your project is so wonderful! I was super inspired by your creativity. I would love to invite you to link up your project at Whimsy Home Wednesdays to inspire others and have a chance to be featured – find the party here -> https://fifthsparrownomore.com/whimsy-home-wednesday-blog-link-party-no-14/
Hi Kristin!
Thanks so much!!
Super clever idea! It turned out perfectly vintage looking
Hi Jennifer!
Thanks so much!!
[…] The Antiqued Journey, Creating a Valentine Wreath Using Paper Doilies […]
[…] created this Valentines Day wreath using paper doilies last year. The idea was born from of a stack of paper doilies that had been in my craft drawer for […]
[…] if you are looking for an easy Valentine DIY, you can create this Valentine’s wreath using only paper doilies and some […]
[…] DIY Valentine’s Wreath […]