Posts on theantiquedjourney.com may contain affiliate links. As an Amazon Associate, I earn on qualifying purchases. You can read the full privacy policy and disclosures here.
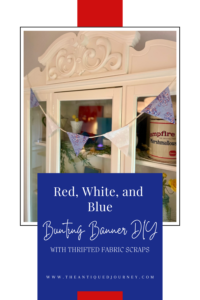
Patriotic Bunting Banner DIY from Fabric Scraps
By Rachel
|
Share this post. Share the Journey!
Last Updated on February 19, 2026 by Rachel
Learn how to easily create a no-sew patriotic bunting banner DIY from fabric scraps for the summer festivities!
As I was perusing my favorite thrift store a few weeks ago, I came across piles and piles of large fabric scraps that someone had donated. It must have been hundreds of dollars worth of fabric! I took my time sorting through it all and came out with two rolls of fabric that I thought I could do something with. Join me today as I show you how to create this easy, no-sew patriotic bunting banner DIY from fabric scraps for summer!
Re-Purposing Fabric Scraps from the Thrift Store
When I got home with said fabric my hubby says “You have such a love for textiles!” I thought for a minute and was like, “You are totally right!” I think in another career I would love to be a fabric designer.
Browsing through various fabrics inspires me and usually puts me in a very creative head space. All of the different patterns evoke distinct moods and feelings, which plays into the overall aesthetic of a space. That speaks to me, you know??

Thrifting for Secondhand Craft Supplies
Anyways, I’ve said it before, but you can find crafting items at the thrift store for such inexpensive prices if you just take a minute to look. The two fabrics that I found were $3.99 a piece, each containing at least 3 yards of material. You can’t even buy one yard of fabric for $3.99 at the craft store!
I knew these patriotic looking textiles would be so fun to use for Summer. If you look closely, the red, white and blue fabric actually has a little farm scene all over it. Just adorable.
This DIY is a fun one so let’s get into it!
Materials and Supplies for a Patriotic Bunting Banner DIY
You don’t need many supplies or materials for this project.
Besides the fabric, I had everything else in my craft drawer.

- scrap fabric in at least 2 different patterns or colors
- hot glue gun and glue sticks
- ruler or measuring tape
- rope, string or twine
- fabric scissors
- cardstock
- Sharpie
- pencil
No- Sew Patriotic Bunting Banner DIY from Fabric Scraps How-To
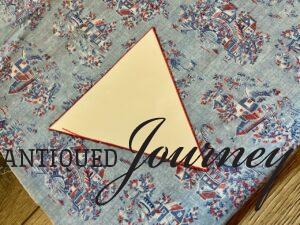
Step 1: Make a Triangle Template.
To be sure all of the bunting pieces are the same size, the first thing you will want to do is make a triangle template.
To do this, I simply measured out a 6 by 6 by 6 inch triangle on a piece of card stock and then cut it out.
Tip: You can choose to make your triangles any size. It’s really up to you how small or large you want your banner to be.
*This is also a good time to plug in your hot glue gun and let it heat up.*

Step 2: Trace Triangles Onto Fabric.
First, fold the fabric in half if possible. This way, you can cut out two triangles at a time.
Then, place the triangle on top of the fabric.
Tip: I suggest turning the fabric inside out so that the pale side is facing up. This will help the marker outline to not be seen on each triangle after it’s cut out.
I used a Sharpie marker to trace the triangle on to the fabric so that it was easy to see. Use whatever writing utensil is most comfortable.
You could also cut around the triangle without tracing if that’s your jam.

I continued this process with both fabrics until I had all of the triangles that were needed for my banner.

Step 3: Cut Out Triangles.
Next, cut out all of the triangles that you traced in the previous step.
Tip: I recommend using a sharp fabric scissors so you don’t get frayed or uneven edges.

I ended up cutting out 8 triangles from each fabric pattern.
You may have more or less depending on the size of your banner.

Step 4: Cut Rope to Length.
You guys. I did not measure the length of my rope! I eye-balled it and called it good. Sorry!
My guess is that it’s around 9 feet long.

Step 5: Glue Triangles Onto Rope.
First, I measured 3 inches in from the end of the left side of the rope and marked that spot with a pencil.
The pencil spot is where I will glue the left end of the first triangle.

Then, position the first triangle in place.
The easiest way I found to do this is to place the long side at the top but flipped over so that the pale, back side of the fabric is showing. That’s where the hot glue will go and then you can just flip it atop the rope!

Next, squeeze a thin line of hot glue all the way across the top of the triangle.

Then, flip the triangle over and roll the top portion over the rope to secure.

You are going to continue this process with each triangle. Be sure to measure 3 inches or however much space you would like in-between your flags each time and mark it with a pencil.

I did an every-other pattern with my triangles but you do whatever is pleasing to you.

I ended up using 7 of each triangle for a total of 14 bunting flags.

A few things:
- If I were to make this again, I would make my flags 2 inches larger.
- I don’t have pinking shears like my friend Anna used for her flag garland but I would have liked to use one to cut out my triangles. It would make the edges a little cleaner. But, wabi-sabi, you know?!
- You could also trim out each triangle with ribbon or rick-rack but again I didn’t have any on hand at the time!
Where to Display a Bunting Banner
A bunting banner is the type of decor piece that you can display just about anywhere!
Since this is a patriotic themed banner, you can pull it out year after year to decorate for Memorial Day, 4th of July, or Flag Day.
Since my Summer hutch has a patriotic theme to it, I decided to drape my bunting banner across it.

Here are some places to try:
- hang it over a hutch
- draped across on outdoor fence or lattice
- across a shelf like a garland

- place it over a mirror
- spanning a doorway or archway
- weave it through a vignette on a shelf or credenza

Closing Tidbits on a Patriotic Bunting Banner DIY from Fabric Scraps
This patriotic bunting banner DIY is such a fun accessory to use for Summer! Creating your own home decor may be a little time consuming and tedious at times but you guys, it is so rewarding and well worth the effort.
Your home is a reflection of you. When you can piece together a one-of-a-kind decoration, handmade by you, that is something to be celebrated!
Be encouraged to create, finding new ways of doing things along the way.

Leave me a comment! Do you have any scrap fabric laying around that you could use for crafting? I love hearing from you!
Follow Along with The Antiqued Journey
Pinterest | Facebook | Instagram | LTK | Amazon | Lowe’s

Just click the red button in the left corner!
If you are new here, I’m Rachel, the writer and content creator here at The Antiqued Journey. I’m so happy to have you! I encourage you to stop by the ‘about me’ page to get to know me a little more. Here on the blog, you will find loads of inspiration for decorating with vintage and antique decor, simple DIY crafts and many thrifting adventures. If that interests you, I invite you to sign up for my e-mail. You will receive a free digital download as a thank you!
Shop Red, White, and Blue Bunting Banners

More Summer Posts to Enjoy

Quick and Simple Summer Floral Displays


Feeling a little unsure where to start with vintage decor?
I created Found and Favored, a beginner-friendly guide that walks you through what to look for, how to spot quality pieces, and how to style vintage finds with confidence — without overspending or feeling overwhelmed.

Hey! I’m Rachel!
I’m so glad you are here! Old things are my jam. Antique malls and thrift stores are my happy places.
Here on the blog I love to share my excitement, knowledge, and ideas about all things antique, vintage, and thrifted. Let’s journey together!
Want to style vintage decor with confidence?
Get the beginner’s guide that will save you money and help you find real treasures.

Sign me up for the
Journey!
Sign up for free antique and vintage inspiration, DIY projects, and thrifting tips straight to your inbox.
14 Comments. Leave new
Seriously such a cute idea and at such a great price too, Rachel! I love the fabric you found and I can’t get over the price tag either. I definitely need to come shopping with you! Hugs, CoCo
Hi!!
Thank you!! I would LOVE to go shopping with you…gosh that would be so fun! Happy day to you, friend!
Hey Rachel! I adore the red, white, and blue fabric you bought! It’s so pretty but does not scream the 4th of July! Plus it was such a great deal! Your banner turned out great! Another fabulous find on your part! Happy day, Donna
Hi!
Thank you!! I’m so happy I found that fabric…it can be used for so many projects!!
[…] So, I thought for a minute about how I could cover up the glue and then a lightbulb went off! I could use the same fabric from my bunting DIY! […]
Rachel! This idea is adorable. I love that you used thrifted fabric! Your pennant banner is so cheerful and perfect for summer. Nice job friend. Obviously – pinned.
Hi!
Thank you!!
[…] patriotic bunting banner DIY DIY mini tart pan coasters with cane […]
[…] Fabric Bunting Banner DIY DIY Tart Pan Coasters with […]
This is such a fun idea. And the fabric is so lovely.
Hi Tamara!
I’m so happy you came by today!! Thanks so much!!
[…] I didn’t have any other chargers to go with the patriotic theme and I had more of this thrifted fabric leftover, so I thought I would put it to use […]
[…] that I thought I could do something with. Come along as I show you how to create this easy, no-sew patriotic bunting banner DIY for […]
[…] DIY Bunting Banner […]