Posts on theantiquedjourney.com may contain affiliate links. As an Amazon Associate, I earn on qualifying purchases. You can read the full privacy policy and disclosures here.
DIY Christmas Gift Tags with Stamps
By Rachel
|
Share this post. Share the Journey!
Last Updated on October 10, 2025 by Rachel
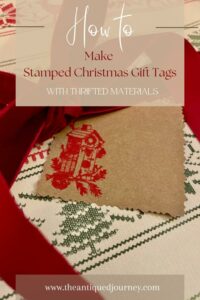
Learn how to easily make DIY Christmas gift tags with stamps!
On a recent trip to the thrift store, I came across a pack of Christmas stamps. Instantly, I knew they could be used to create holiday gift tags! This project is super fun and festive, making your gifts seem that much more special for your loved ones. I hope these DIY Christmas gift tags encourage you to create something meaningful this season!
A Thrifty Christmas: Creating DIY Gift Tags with Stamps
I’ve said it before but thrift stores are treasure chests for many things, especially craft supplies. You can find yarn, paint, fabric, and in my case stamps, for a dollar or two. The pack of Christmas stamps that inspired this project was only $3.00! You can’t even find gift tags at a retail store for that price.
Creating your own gift tags allows for a much more personal gift-giving experience. You get to choose the color, the design, and even the ribbon. I made roughly 15 gift tags for under $7.00. Allow me to show you how to make these gift tags and watch your loved ones faces light up!

Supplies Needed for DIY Holiday Gift Tags
(links are provided below!)
- Kraft paper
- rubber Christmas stamps
- craft paint (I used white, red, and green)
- paper plate
- paint dobber
- damp paper towel
- ribbon
- hole punch
- scissors
- Sharpie or pen
Instructions for DIY Christmas Gift Tags With Stamps
1. Start by laying the Kraft paper out on a flat surface.
Next, choose the stamp that you want to start with.

2. Squeeze paint onto a paper plate.
Then, push the dobber down into the paint, dabbing off any excess

3. Paint the rubber part of the stamp with the dobber.
You will want to press firmly onto the stamp to ensure that you are getting paint into all of the crevices.

Then, turn the stamp over and press firmly down onto the Kraft paper.

I recommend rocking the stamp back and forth with your hand to make sure all of the edges are seen on the paper.
Now you have one stamp complete!

Design Ideas for Your DIY Christmas Gift Tags
I repeated the above process using different stamps and colors. Be sure to leave about 2 inches between stamps on the Kraft paper so you have enough room to cut them out.
Here are examples of the other stamp designs that I made. Keep in mind that these are handmade tags so perfection is not the aim here.
I used multiple colors on some of them. This stamp is longer in length with cardinals and Poinsettias.

Sometimes the whole stamp didn’t come out on the paper but that’s okay!
I almost think it makes the stamped picture look a little more rustic.

I also tried two colors on this ‘To, From’ stamp.

After awhile, I realized that I was loving either only white paint or only red paint.
Here is a white wreath. The texture of the branches on this wreath came out so nicely on the paper!

For contrast, here is the same wreath with red paint.

This cutie little bird house ended up being my favorite stamp and the one I used the most.
There is just something about this stamp that spoke to me! Here it is in white.

And then here it is in red.
So cute, right?!
After I had all of my stamps done, I let them dry for about 30 minutes.

Adding Embellishments to Homemade Christmas Gift Tags
Then, I took the time to hand pick which tag I wanted to use for each of my family members.
I used a sharpie marker to write each person’s name on the tag.
Continue this step until you have all of the tags written out.

4. Next, cut out each gift tag.
I used fancy scissors for this part but any scissor will do the job!

All I did was simply cut around each stamped shape. Some of them I cut in squares, some rectangles, and others in circles. It’s really up to you how you want your gift tags to look!
Tip: Leave a little excess paper showing on the left side of each tag so you have room for the ribbon hole.

5. Then, punch the ribbon hole.
Using a hole puncher, punch a hole on the upper left side of the tag.

This hole will allow the ribbon to slide through it easily.

6. Lastly, attach the ribbon.
The finishing step is to tie a ribbon on to each tag. I had a variety of Christmas ribbon on hand to choose from but use whatever you would like.

I chose one ribbon for each tag. To do this, simply slide the tag end of the ribbon through the front of the hole and pull it out the back side.
I then tied one knot in the ribbon so that it was secure but you don’t have to. It’s optional!

7. Attach each tag to its gift!
You have created your Christmas gift tags and now it’s time to attach them to the presents.
This process can also be creative because you get to make each gift look festive and beautiful, true to your style!

This pretty wrapping paper is from the Hearth and Hand line at Target. Paired with the velvet ribbon, I thought it was the perfect paper to use with these gift tags!

Budget-Friendly Holiday Gift Wrapping
My gift tags turned out better than I had hoped which makes me so happy! This just goes to show you that if you see something in a store that you think you could make, you totally can, and sometimes for better and cheaper!
These gift tags truly are so simple to make. I hope this post encourages you to design something similar for the presents that you are giving this season.
Closing Tidbits on DIY Christmas Gift Tags with Stamps
Creating handmade items to share with people that you cherish is so rewarding. These DIY Christmas gift tags with stamps are no exception! They are the perfect balance of rustic, Scandinavian and vintage Christmas all rolled into one gift tag.
The thoughtfulness behind them is what others will remember. Be encouraged to seek creativity in whichever way you find it and find joy along the way.

Let me know in the comments if this tutorial was helpful for you! Have you ever made homemade gift tags before? I would love to know!

Just click the red button in the left corner to save it for later!
If you are new here, I’m Rachel, the writer and content creator here at The Antiqued Journey. I’m so happy to have you! I encourage you to stop by the ‘about me’ page to get to know me a little more.
Here on the blog, you will find loads of inspiration for decorating with vintage and antique decor, simple DIY crafts and many thrifting adventures. If that interests you, I invite you to sign up for my e-mail. You will receive a free digital download as a thank you!
Follow Along with The Antiqued Journey
- The Antiqued Journey shop
- Browse curated finds in my LTK shop
Other Christmas Posts to Enjoy

Vintage Sheet Music Garland DIY


Feeling a little unsure where to start with vintage decor?
I created Found and Favored, a beginner-friendly guide that walks you through what to look for, how to spot quality pieces, and how to style vintage finds with confidence — without overspending or feeling overwhelmed.

Hey! I’m Rachel!
I’m so glad you are here! Old things are my jam. Antique malls and thrift stores are my happy places.
Here on the blog I love to share my excitement, knowledge, and ideas about all things antique, vintage, and thrifted. Let’s journey together!
Want to style vintage decor with confidence?
Get the beginner’s guide that will save you money and help you find real treasures.

Sign me up for the
Journey!
Sign up for free antique and vintage inspiration, DIY projects, and thrifting tips straight to your inbox.
21 Comments. Leave new
Super cute and fun Rachel. I would have never thought of using paint because I’m so messy, but you figured it out. Love it!!!
Hey Debra!
Thank you!!! For me, the paint helps to give each stamp more texture, that’s why I chose to do that. Thanks for coming by, Merry Christmas!
Love these, however I think I would have cut my tags out first and then stamped.
Thanks! you can make them however you please…everyone is different! Thanks for reading!
These are adorable Rachel! You found the perfect stamps for these tags!
Hi!
Thank you!! These were fun 🙂 Merry Christmas!
You always have the best of luck! I can’t believe you found such great stamps at the thrift store. I did not buy any Christmas items from the thrift stores here this year. Your tags look great! Have a great Christmas!
Hello!
Thank you!! These were fun 🙂 Thanks for coming by today Donna…happy Christmas!
Love this idea! So personal and lovely!
Thanks mom!
Rachel – Your tags are fabulous! What a wonderful way to personalize a gift. Also, its so cute that your Mom commented on your post. Thank you for sharing another awesome idea with us!
Thanks!! My mom reads all my posts 🙂
[…] DIY Christmas Gift Tags With Stamps […]
[…] DIY Christmas Gift Tags with Stamps […]
[…] DIY Christmas Gift Tags with Stamps […]
[…] DIY Christmas Gift Tags with Stamps […]
[…] DIY Christmas Gift Tags with Stamps […]
[…] it, guys! It’s literally the easiest Christmas DIY I’ve ever come up with but it truly adds the most romantic and whimsical holiday touch to my […]
[…] DIY Christmas Gift Tags with Stamps […]
[…] DIY Christmas Gift Tags with Stamps […]
[…] Christmas Gift Tags with Stamps […]