Last Updated on January 15, 2025 by Rachel
This project will teach you how to create a DIY ticking stripe fabric garland!
Fabric is such a versatile craft item. You can make such unique projects with fabric that are tailored to your style, including simple home decor! Follow along with this simple, no sew tutorial on creating your very own DIY ticking stripe fabric garland.

Materials Needed to Create a Ticking Stripe Garland
- 1/2 yard of ticking stripe fabric
- 1/2 yard of white fabric
- scissors
- twine or thin rope
- a tape measure
- pencil
Directions for a DIY Ticking Stripe Fabric Garland
1. Cut off the unsightly ends of each fabric pieces.
Spread your fabric out on the floor.
If your fabric pieces have edges that have printed words or anything else that won’t look pretty, go ahead and cut those parts off. You will lose a little bit of fabric yardage but that’s okay.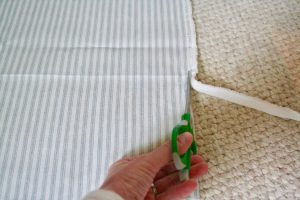
2. Measure out the width of each strip.
I decided to make each of my strips to be 1.5 inches wide but you can make yours larger or smaller depending on your preference. Make a small mark with a pencil every 1.5 inches and that’s where you will cut your strip.
Continue this process until you have the markings all the way across the fabric.
3. Cut the fabric strips.
You can either cut the fabric starting at the pencil mark, or sometimes the fabric is thin enough to where you can make a slit with a scissors and then just rip the fabric from there.
Continue this process until you have all your fabric in strips.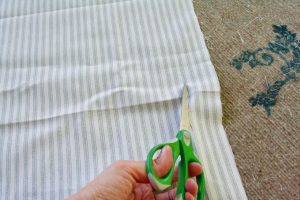
4. Measure the rope.
Figure out how long you would like your garland to be. I cut my rope a little longer than 6 feet.
You can always cut off excess it it’s too long.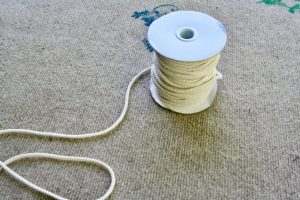
5. Loop your fabric strips over the rope.
Fold a strip of fabric in half, loop it over the rope, and then pull the ends through the top to secure.
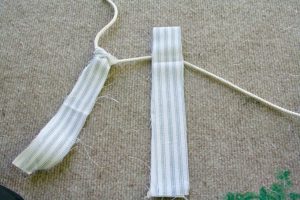 Continue this process, going every other, until you have used up all of the fabric strips.

6. Clean it up.
By this I mean pull off any long threads or parts that have too much fray or extra threads.

Where to Display a Ticking Stripe Garland
Pick a spot in your home to hang your pretty garland.
Ideal spots can include:
- across a mantel
- along a shelf
- between a doorway
- over a hutch


Closing Tidbits on How to Make a Ticking Stripe Garland
There you have it! A charming DIY ticking stripe fabric garland that will add whimsy to your home.
You can even make more of these garlands for changes in the season. For example, you could create a plaid fabric garland paired with beige linen fabric for fall or a pretty paisley fabric garland for winter.
I hope this encourages you to create a fabric garland to adorn your home. The ticking stripe fabric itself lends a calming texture paired with the simplicity of the white. It is a simple project that can be displayed in any room in your home.

If you are new here, I’m Rachel, the writer and content creator here at The Antiqued Journey. I’m so happy to have you! I encourage you to stop by the ‘about me’ page to get to know me a little more.
Here on the blog, you will find loads of inspiration for decorating with vintage and antique decor, simple DIY crafts and many thrifting adventures. If that interests you, I invite you to sign up for my e-mail. You will receive a free digital download as a thank you!
Follow Along with The Antiqued Journey
- The Antiqued Journey shop
- Shop exclusive content in my LTK shop!


2 Comments. Leave new
Love how this simple garland has such a big impact. Very cute idea!
Thank you!!