Last Updated on October 23, 2024 by Rachel
Learn how to make a DIY holiday garland made from oranges with this simple tutorial!
I’ll bet there are hundreds of different ways that you can use oranges, but today’s DIY is using them to make a pretty holiday garland! The scent combination of orange and Christmas greenery like pine or spruce is simply wonderful. Follow along as I take you on a step by step process on how to create one for your own home.

Materials Needed for DIY Orange Holiday Garland
- navel oranges
- ribbon
- baking trays
- an oven
- cutting board
- sharp knife
- a chopstick or straw
DIY Holiday Garland Made From Oranges
1.Prepare the Oranges for your DIY Holiday Garland.
You will need to preheat your oven to 225 degrees.
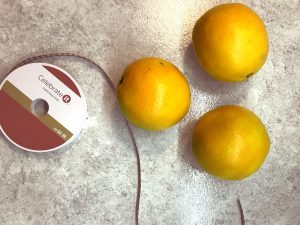
While that is heating up, use a cutting board and knife to cut your oranges into thin slices…the thinner you can cut them the easier it will be to dry them out.

Arrange them on baking trays.

If you have a helper, even better!
This is Tilly. She’s my helper :-).

2. Bake those Oranges!
Once you have the oranges arranged on trays, place them in the oven and bake for 1 hour. Once that hour is up, flip all the orange slices over and bake the other side for another hour.
Tip: I tried the 2 hour bake time and they still came out pretty soft. I left them overnight to see if they would dry more but ended up having to bake them for another 45 minutes the next day. Baking times may vary depending on your oven.

3. Let Cool.
Let the slices cool and dry for at least 2 hours after taking them out of the oven.

4. Poke Holes.
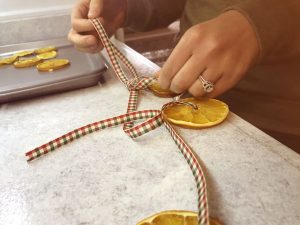
Using something like a chopstick or plastic straw, poke holes in the middle of each orange slice.
Be sure that the holes are large enough for your ribbon to fit through.

5. Assemble your Garland.
Thread the orange slices onto your ribbon, looping the ribbon at the top of each slice to secure in place.
Tip: I used plaid ribbon because it feels very Christmas-y, but you pick a type that you love.
It’s up to you how spaced apart you would like them to be but I did about every 4 inches. You might have enough oranges to make 2 garlands depending on how long or short you would like the garland to be.
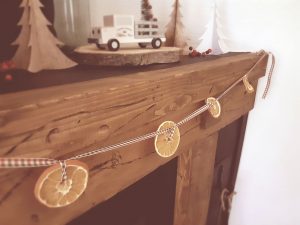
Creative Uses for a Dried Orange Slice Garland
Find a spot(s) in your home to display your pretty garland.
Examples could include:
- on a fireplace mantel
- across the ledge of a shelf
- wrapped around a beam
- interwoven in a greenery garland
- draped on your Christmas tree
- wrapped around a green wreath- Tip: I did this with the leftover oranges that didn’t get used on the larger garland. Using the plain green wreath that I have on the front door all year round, it was instantly transformed to a holiday wreath by wrapping a smaller orange garland around it and adding faux red berries with floral wire.

Closing Tidbits on a Homemade Orange Slice Christmas Garland
This simple DIY garland will add a fresh citrus scent to your home this Christmas season. The soft texture of the oranges combines beautifully with the rustic elements of a Christmas tree and the orange color adds an unexpected twist with the reds and greens of the season.
I hope you are inspired to give this DIY a try and feel your home come alive with Christmas cheer!

Leave me a comment! Have you ever dried oranges before? I love hearing from you!
If you are new here, I’m Rachel, the writer and content creator here at The Antiqued Journey. I’m so happy to have you! I encourage you to stop by the ‘about me’ page to get to know me a little more.
Here on the blog, you will find loads of inspiration for decorating with vintage and antique decor, simple DIY crafts and many thrifting adventures. If that interests you, I invite you to sign up for my e-mail. You will receive a free digital download as a thank you!
Follow Along with The Antiqued Journey
- The Antiqued Journey shop
- Browse curated finds in my LTK shop


2 Comments. Leave new
Hi Rachel! Every year I say I’m going to do this, but I haven’t yet! I just love the look of the dried oranges, and I can only imagine how wonderful it must make your home smell! Maybe this year will be the one! Pinning it just in case!!
Hello!
These are seriously SO easy to make and are so pretty to use with Christmas greenery!! I hope you try it this year…it’s so much fun!