Last Updated on October 22, 2021 by Rachel Granholm
These uplifting and delicious lemon cookies are packed with big, bold lemon flavor! They’re soft, chewy and oh so satisfying!

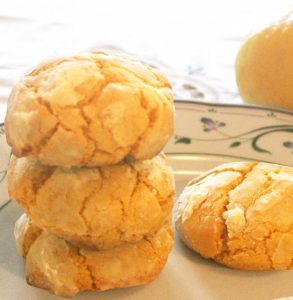
A delicious treat for the spring season, these lemon cookies are soft, chewy, and packed with flavor. The pretty yellow color from the lemon zest is so refreshing after a long winter! Get inspired to bake and whip these up today by following the recipe.
This post contains affiliate links. That simply means I make a small commission at no extra cost to you. As an Amazon Associate I earn on qualifying purchases.
Materials Needed:
- cookie sheets
- a whisk
- mixing bowl
- an electric mixer
- measuring cups
- Tablespoons and teaspoons
- spatula
- wooden spoon
- hot pads or mitts
- plastic wrap
- tin foil
- a turner
How To Make Lemon Cookies
 Note: Cookies will need to be chilled for 3 hours prior to baking!
 Note: Cookies will need to be chilled for 3 hours prior to baking!
INGREDIENTS
- 1/2 cup unsalted butter, softened
- 3/4 cup granulated sugar
- 2 tablespoons light brown sugar, packed
- 1 large egg
- 1 tablespoon lemon extract
- 2 tablespoons lemon zest
- 1 tablespoon honey
- yellow food coloring, optional and as desired
- 2 cups flour
- 2 teaspoons cornstarch
- pinch salt, optional and to taste
- 1 teaspoon baking soda
- 2 tablespoons lemon juice
INSTRUCTIONS
- In the bowl of a stand mixer fitted with the paddle attachment (or large mixing bowl and electric mixer) combine the butter, sugars, egg, lemon extract, and beat on medium-high speed until creamed, light, fluffy, and well combined, about 4 minutes.
- Stop mixing and scrape down the sides of the bowl. Then add the lemon zest, honey, optional food coloring, and beat on medium-high speed until well combined, about 2 minutes. Add drops of food coloring to reach the desired shade. Keep in mind that the shade of yellow will lighten a bit when you add the dry ingredients
- Next, stop mixing and scrape down the sides of the bowl and add the flour, cornstarch, optional salt.
- Put the baking soda into a small bowl and add the lemon juice directly on top of the baking soda. It should bubble and foam, which means the baking soda has been activated. This is what you want; if your soda doesn’t bubble it’s old and expired. Add the foamy baking soda to the mixer with the other ingredients and beat on low speed until just combined, about 1 minute.
- Stop mixing and scrape down the sides of the bowl. Using an ice cookie scoop, or your hands, form approximately 12 to 14 equal-sized mounds of dough, roll into balls, and flatten slightly (I forgot to flatten mine in the batch I made for this post, they turned out much more plump but are harder to bake properly).
- Place mounds on a large plate or tray, cover with plasticwrap, and refrigerate for at least 3 hours, up to 5 days. DO NOT bake with unchilled dough because cookies will bake thinner, flatter, and be more prone to spreading.
- Preheat oven to 350F.
- Optionally, roll the cookies around in confectioners’ sugar until lightly coated.
- Place dough mounds on a non-stick baking sheet, spaced at least 2 inches apart.
- Bake for about 10 minutes, or until edges have set and tops are just set and cracking a bit, even if slightly undercooked, pale, and glossy in the center; don’t overbake or undersides could become too browned. I made this mistake a few times thinking the cookies weren’t done. They’ll be a bit soft when you take them out. Cookies firm up as they cool.
- Allow cookies to for about 10 minutes before serving. I let them cool on tinfoil on the countertop without a rack.
Simple and flavorful, these cookies will delight tastebuds of all ages! Stacked up on a pretty vintage platter or cake plate, the lemon yellow color will look beautiful and enticing. I hope this cookie recipe encourages you to get in the kitchen and create a tasty treat.


