Posts on theantiquedjourney.com may contain affiliate links. As an Amazon Associate, I earn on qualifying purchases. You can read the full privacy policy and disclosures here.
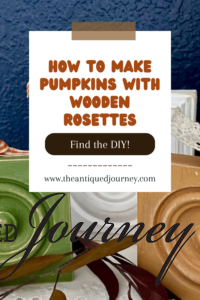
Pumpkin Crafts: How To Make Polka Dot Pumpkins
By Rachel
|
Share this post. Share the Journey!
Last Updated on July 24, 2025 by Rachel
Pumpkin crafts for anyone… kids to adults alike! Learn how to make polka dot pumpkins using simple materials from around the house.
I am so thrilled to be joining some blogger friends today for this fall DIY blog hop hosted by Open Doors Open Hearts! The DIY that I’m sharing today is super easy. You might even have some of the needed materials laying around your house already, so join me as I show you pumpkin crafts and how to make polka dot pumpkins!

DIY Vintage and Cottage Style Decor for Fall
If you found your way here from Jen at Midwest Life and Style, welcome, and thank you so much for stopping by! I just love her tutorial on How To Make a Stacked Pumpkin Topiary!
Here on the blog, you will find loads of inspiration for decorating with vintage and antique decor, simple DIY crafts and many thrifting adventures. If that interests you, I invite you to sign up for my e-mail. You will receive a free digital download as a thank you!
Quick and Easy Fall DIY Decor
Once again, I was inspired to create another DIY from a magazine I was reading a few weeks ago. The beauty about this craft is that you can alter it to fit your style by using a different variety of pumpkin or choosing different paint colors.
This pumpkin DIY took me only an hour to complete from start to finish and cost me a total of $15. Let’s get into it!

Materials Needed for DIY Pumpkins with Polka Dotted Accents
Tip: Try and find pumpkins that have substantial stems on them. It makes this whole project look that much better!
- white baby boo pumpkins ( I bought 5 from Trader Joe’s )
- decorative furniture tacks
- small felt chair bottoms in white or tan
- craft paintbrushes
- paper plate
- craft paint in orange, green, and metallic copper
Pumpkin Crafts: How To Make Polka Dot Pumpkins
1. Cover Work Surface with Paper Towel or Old Rag.
Then, start by wiping off each pumpkin with a damp rag or paper towel to remove any debris.

2. Paint the Felt Chair Bottoms.

To do this, pick one color of craft paint. I chose orange first.
Paint one full sheet of the felt chair bottoms with your chosen paint color.

Using your paintbrush, be sure to paint all the way around the sides as well.
All of the sides will be seen when you adhere them to the pumpkin.

Then, using the other color of craft paint, paint another whole sheet of felt chair bottoms.
This time I used an olive green color.

Let both of those sheets dry completely before continuing.
You can choose to use more colors if you like. So, if you wanted to only have these felt dots on your pumpkins, you could opt to paint five sheets of these in five different colors. It’s totally up to you!
3. Choose the Pumpkins You Want to Adhere Felt Dots.
Then, simply peel off the felt dots one at a time and adhere them to the pumpkin.

There really isn’t a method for adhering the dots.
I just went back and forth with them, making sure the pumpkin wasn’t looking too cluttered but also not too bare.

I used the same process with the green dots.

4. Grab the Furniture Tacks.
I liked these because there were many different metal hues to choose from!

For this step, all you do is gently press the tack into the pumpkin.
I chose to use the copper colored tacks as well as the brass ones for a vintage feel to my pumpkins.

Again, there isn’t a right or wrong way to do this process. I simply pushed them in and spaced them apart in kind of a zig-zag formation.
That way, I wasn’t getting them too close together. You do what looks pleasing to you!

I truly love how these brass tacks look against the white pumpkin. It’s so pretty!
Continue this same process with the tacks until you have all of your pumpkins bedazzled.

5. Paint the Stems.
I did this to step to create a cohesiveness between the pumpkins.
For something extra fun, I chose to use a metallic copper craft paint.

Simply dab a little paint onto a brush and paint it onto each stem.

You don’t need much copper paint to cover the stems.
Continue this process until you have all of the stems painted.
 That’s it!
Now, you get to display you’re finished pumpkins!

How to Display DIY Pumpkins for Low Budget Fall Decor
There are many ways that you can go about displaying your pumpkins. Above, I displayed them altogether in a vintage bowl.
You can also display the tack pumpkins together and the felt dot pumpkins together.
Or, try dispersing them separately throughout your home!
Other ideas include:
- style them in an apple basket
- use as porch decor
- line them up across a windowsill

Closing Tidbits on Pumpkin Crafts: How To Make Polka Dot Pumpkins
I hope this project on how to make polka dot pumpkins encourages you to get creative and try something new!
This DIY craft sounded too simple in my head, like so simple that I almost decided to share something else. But, at the end of the day, sometimes simple is better. It’s completely okay to not do some crazy, over the top project once in a while that needs a bajillion tools and materials.
Be encouraged to pause, take a breath, and carve out an hour for yourself to be creative, however that is for you.

Up next on this blog hop is Lora Bloomquist Create and Ponder. Lora and I live near each other here in Minnesota. We met for coffee over the summer and she is such a joy. Her style and decorating is out of this world gorgeous. Go on over, say hello, and read all about her fall DIY, a Leafy DIY Fabric Scrap Wreath!

Just click the red button in the left corner!

5 Fall DIY Decor Crafts
I look up to and admire each of these beautiful women. They do such amazing work and are so creative! Here are my friends who are included in today’s hop. I would be so grateful if you would stop by and say hello to each of them!
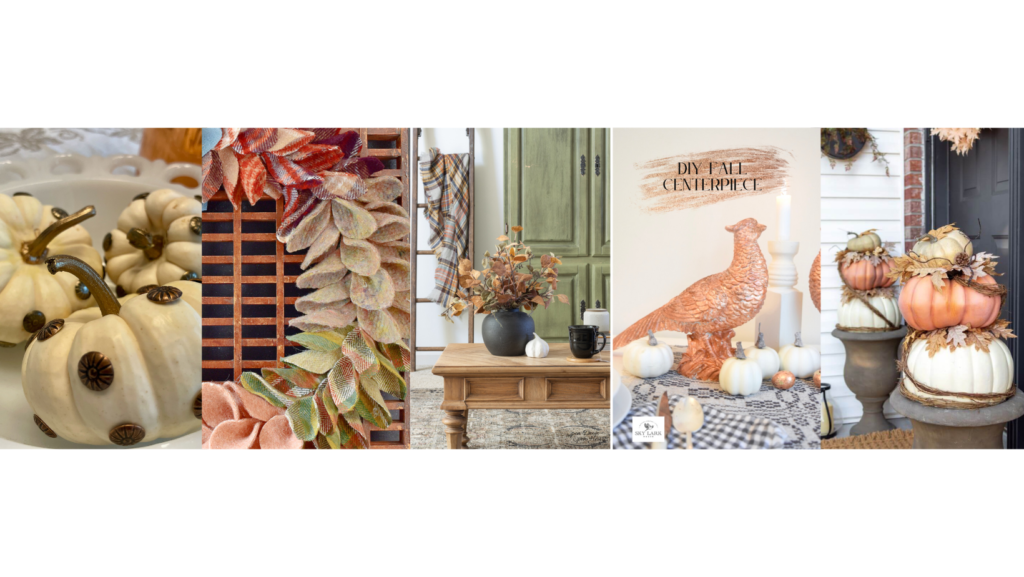
The Antiqued Journey | Create and Ponder | Open Doors Open Hearts
Sky Lark House | Midwest Life and Style
If you are new here, I’m Rachel, the writer and content creator here at The Antiqued Journey. I’m so happy to have you! I encourage you to stop by the ‘about me’ page to get to know me a little more.
Here on the blog, you will find loads of inspiration for decorating with vintage and antique decor, simple DIY crafts and many thrifting adventures. If that interests you, I invite you to sign up for my e-mail. You will receive a free digital download as a thank you!
Follow Along with The Antiqued Journey
- The Antiqued Journey shop
- Browse my LTK Boutique for hand-picked finds!
Other Fall Posts to Enjoy

Feeling a little unsure where to start with vintage decor?
I created Found and Favored, a beginner-friendly guide that walks you through what to look for, how to spot quality pieces, and how to style vintage finds with confidence — without overspending or feeling overwhelmed.

Hey! I’m Rachel!
I’m so glad you are here! Old things are my jam. Antique malls and thrift stores are my happy places.
Here on the blog I love to share my excitement, knowledge, and ideas about all things antique, vintage, and thrifted. Let’s journey together!
Want to style vintage decor with confidence?
Get the beginner’s guide that will save you money and help you find real treasures.

Sign me up for the
Journey!
Sign up for free antique and vintage inspiration, DIY projects, and thrifting tips straight to your inbox.
22 Comments. Leave new
Hey Rachel! I love how these turned out! This is perfect for people who want to create some unique pumpkins but who are short on time. Pinned!!
Hi!
Thank you!!!!
Rachel!! This is such a creative and fun idea! I love it!! My favorite is the copper stem!! I need more copper in my life hahaha
Thanks so much, Aliya!!! And thanks for hosting this hop…so much fun!!!
Rachel these pumpkins came out so cute! Such a great idea
Thanks, Meagan!!!
Oh my goodness. What a fun idea, Rachel. I love how simple, yet beautiful they are. They are so darn cute and perfect for fall. They would even be a fun project to work on with small kiddos.
Happy to be hopping with you today. Pinned!
Thanks, friend!! Yes…I had that same thought about how fun it would be for some kiddos to work on. Super good fine motor skills!! I’m so happy to be hopping with you today…so much fun!!
[…] your way. Thanks to Aliya from Open Doors Open Hearts for hosting us! If you’re visiting from The Antiqued Journey, weren’t Rachel’s polka dot pumpkins so cute? Fun fact: Rachel and I both live in the Mpls, MN […]
These turned out so cute! I love displayed all together in a bowl. Yes, simple is the way to go! So happy to be joining you today:)
Thanks so much, Lora!!! I’m so happy to be hopping with you today! You are just filled with inspiration!
These are super cute! And I think a great alternative to carving for the kiddos who get squeamish with cleaning the inside of the pumpkins. 🙂
https://abeilleflowerco.com
Hello!
Thank you…I totally agree!!
Stop it with these cute polka dot pumpkins, Rachel, they are so much fun! I could totally see our family making these because we have lots of different ages and skill levels too. The littles would absolutely love these. Super creative sweet friend, CoCo
Hi!!
Thank you!!! I’ve had SO many people say the same thing! I’m so glad this can be useful for you and your fam! Thanks for reading today, CoCo! Happy weekend!
LOVE THIS TUTORIAL, Ranchel! We will be featuring you starting Wednesday at the Creative Crafts Linky Party!
Creatively, Beth
Hi Beth!
Thank you!! I appreciate the support!!
[…] how to make quick, easy, and elegant Polka Dot Pumpkins using simple materials from around the house! Rachel from The Antiqued Journey will show you two […]
[…] How to Make Polka Dot Pumpkins […]
[…] on the fall decor and DIY blog hop is my friend Rachel at The Antiqued Journey. Rachel shares my passion for vintage finds and budget-friendly decor. I know you’ll love her […]
[…] How To Make Polka Dot Pumpkins […]
[…] How to Make Polka Dot Pumpkins […]